
WinSCP Setup and Usage
WinSCP is a free, open-source SFTP and FTP client used to securely transfer files between your computer and a remote server. It supports drag-and-drop uploads, connection management, and large file transfers on Windows.
Downloading and Installing
Section titled “Downloading and Installing”- Navigate to the WinSCP download page here.
- Click on the download button, it should say something like:
Download WinSCP x.x.x - Run the downloaded file
- If prompted, click
Yeson the User Account Control prompt. - Read and agree with the license agreement, then click
Accept - Choose your preferred installation type, Typical installation is recommended for most users.
- Choose your preferred initial user interface style, select Commander (this shows local and remote files side by side).
- Click
Installand wait for the installation to complete, then clickFinish
Using WinSCP
Section titled “Using WinSCP”- Navigate to your server on the panel.
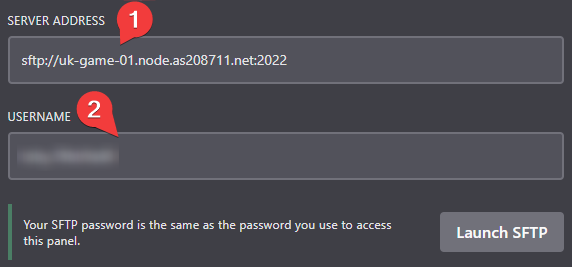
- Go to settings, and view the SFTP details.
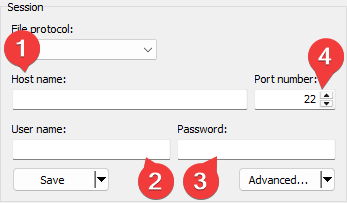
- Fill out the details within WinSCP’s Login window (this opens automatically on launch).
- Copy the server address, and paste it into the
Host namefield on WinSCP. - Copy the username, and paste it into the
User namefield. - Enter your password - this is the same password you use to login to the panel
- Leave the port blank - this will be filled in automatically
- Copy the server address, and paste it into the
- Click
Login. If prompted with an unknown server warning, clickAcceptto trust the server and continue. - You should now be connected to your server. Your local files are shown on the left-hand side, and the remote server files are shown on the right.